


“Your home should be the story of who you are, and a collection of what you love.”
I love that Nate Berkus and his words resonate so much with me. The story of our home began in 2010 when we purchased our 1964 fixer-upper. My husband is very handy and has grown up around people who DIY everything (and make it beautiful). I, however, am anything but handy. But we had a blank canvas of a house and jumped right it.
Over the past six years, I’ve learned a lot about renovation, design, compromise, and just how doable and cost effective DIYs actually are.
Whether your house is a new build or well-loved, these easy DIYs will bring character and personality to your space.
DIY #1: Faux Wainscoting
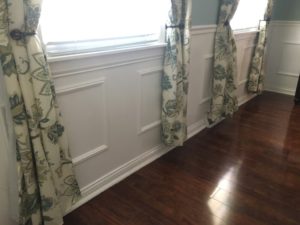
I love the clean, timeless look of wainscoting. It gives a space instant personality. Unfortunately, our home did not have any paneling when we moved in, and we didn’t want to spend the money installing it. But after a little research, I found a solution that looks just like traditional paneling that is a fraction of the cost and time to install.
Materials:
Picture frame moldings
Chair rail
Nail gun/wood putty
White enamel paint (so durable to little hands!)
How To Install Wainscoting:
- Measure the placement of moldings on your wall, evenly space.
Tip: Tape the moldings on the wall to ensure perfect placement.
- Nail moldings into the wall.
You can easily cut the moldings to fit your space.
- Measure and nail chair rail.
- Putty nail holes and silicon edges of moldings and chair rail.
- Sand putty
- Paint!
DIY #2: Whitewashing
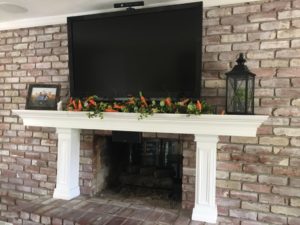 Our 1960s home had a big, red eyesore. The fireplace! I loved the see-through fireplace and the interior brick look, but the brick was blinding. A little mixture of paint and water, a rag, and a few hours, and the fireplace was completely transformed!
Materials:
White paint
Water
Paintbrush
Rag
How To Whitewash Brick:
- Mix the white paint and water, creating a mixture about 2:1 water to paint.
- Brush on paint mixture in sections
- Optional: Paint the grout if needed.
- Using the rag, wipe off excess paint. Wipe off more if you want a lighter look
- Repeat the paint and wipe technique (if needed) to achieve the desired look.
DIY #3: Tile
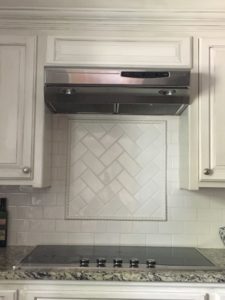 Tiling is a more considerable project. Though it may take longer than a weekend to complete, this is definitely a doable DIY. Using a fun pattern will add a pop of personality to your kitchen. Even a basic, white tile can look custom! I really like the herringbone pattern we did above our stove. It just took a few extra tile cuts using the same subway tile and a cute robe tile to create this fun addition to the back splash.
Materials:
Tile
Grout
Spacers (if needed)
Tile saw
How To Create a Herringbone Tile Pattern:
- Lay out the design on the floor or table before you begin any tiling!
- Lay the full, 45o tiles first, then lay the next time at 90o angle to the first tile. Continue this pattern until you need to cut tiles.
- Mix mortar (follow package instructions)
- Adhere tile to the back splash
- Mix and apply grout (follow package instructions)
- Grout and wipe clean!
DIY #4: Dimmer Switches
This was a game changer. And so easy! My husband suggested putting a dimmer in our son’s nursery. That first middle of the night diaper change was considerably more bearable not being blinded by lights or trying to change a diaper with the light from your iPhone.

Materials:
Dimmer switch (single pull dimmers are the easiest to install)
Phillips head screwdriver
How To Install Dimmer Switches:
- Turn off electricity!
- Remove switch plate.
- Unscrew the switch from the electrical box and pull out with the wires still attached.
- Remove the wires from the old switch
- Use the connectors (supplied with the fixture) to attach the black wires coming out of the dimmer to the colored wires attached on the old switch
- Push the new switch back into the box and screw in place.
- Screw in switch and face plate
Note: Consult an electrician if you are unsure about anything!


Great article Anne! You and Ryan have worked so hard and the payoff is a beautiful home.You two are a great team.Take care,see you soon Mimi and Papa